Five ways to get b-roll from one ride — all on a local GPU
B-roll is the cutaway footage that makes an edit breathe — and onboard POV footage from a single camera has none. I tried five ways to manufacture it from one ATV ride: CV auto-mining of the real footage, generative stills (SDXL-Turbo → RealVisXL img2img), AI Ken Burns via Depth-Anything-V2 parallax, true generated motion via Stable Video Diffusion, and optical-flow slow-motion. All local on a 12 GB card. Here's what each is good for, and the gotchas.
TL;DR — B-roll is the cutaway footage that lets an edit breathe, and onboard POV footage from a single camera has exactly none of it. I took one ATV ride and tried five ways to manufacture b-roll from it: (1) auto-mine the best real frames with OpenCV, (2) generate stills and seed them from real frames with SDXL-Turbo → RealVisXL img2img, (3) fake a cinematic camera move with Depth-Anything-V2 2.5D parallax, (4) generate actual motion with Stable Video Diffusion, and (5) make a slow-motion cut of the real footage with optical-flow interpolation. Everything ran locally on a 12 GB RTX 4070 Ti. They’re complementary — here’s the comparison and the traps.
The problem
Onboard footage — a GoPro/DJI on the handlebars of a go-kart or an ATV — is one continuous first-person shot. It’s great for the action, but an edit needs cutaways: the establishing shot, the scenery, the slow detail that gives the viewer a breath between the intense bits. With one camera and no B-cam, you have none. So: can you manufacture believable b-roll after the fact, locally, for free?
I tried five approaches on a single 11-minute ATV tour through Nordic forest and gravel trails. Each produces a short graded reel; the interesting part is the trade-offs.
1. Auto-mine the real footage (OpenCV)
The cheapest b-roll is the b-roll you already shot but didn’t notice. A small OpenCV pass samples ~1,400 frames across the ride and scores each for sharpness (variance of the Laplacian), colourfulness (the Hasler–Süsstrunk metric), exposure (distance from a mid-tone target) and motion-stability (inter-frame difference — low is good for a stable cutaway). Non-maximum suppression then spreads the picks out so you don’t get eight near-identical frames from the same 20 seconds.
score = 1.1*z(sharp) + 1.0*z(colourful) + 0.8*z(exposure) - 0.9*shake - 6.0*clipping
It’s not glamorous, but it’s instant, free, and 100% authentic. The output is genuinely your ride — just the most b-roll-worthy three seconds you forgot you filmed.
2. Generative stills, matched to the real ride
This is where it got interesting — and where it first went wrong.
Attempt one: pure text-to-image. SDXL-Turbo with prompts like “cinematic misty forest at golden hour” produced beautiful images that looked nothing like the actual ride. Wrong light (sunset vs. the real overcast), no quad in frame, no POV. Gorgeous stock footage for a forest, not this one.
Attempt two: img2img, seeded from real frames. Feeding a real frame in as the init image at moderate denoising strength keeps the real composition — the black quad’s handlebars and mirrors in the foreground, the grass-and-dirt two-track, the overcast palette — and regenerates the detail. Now it intercuts with the real footage. But SDXL-Turbo at strength ≈0.5 still melted: it hallucinated extra gauges onto the dashboard and warped the handlebars. The classic “AI look.”
Attempt three: better models, lower strength. I compared three less-melty methods on the same frames:
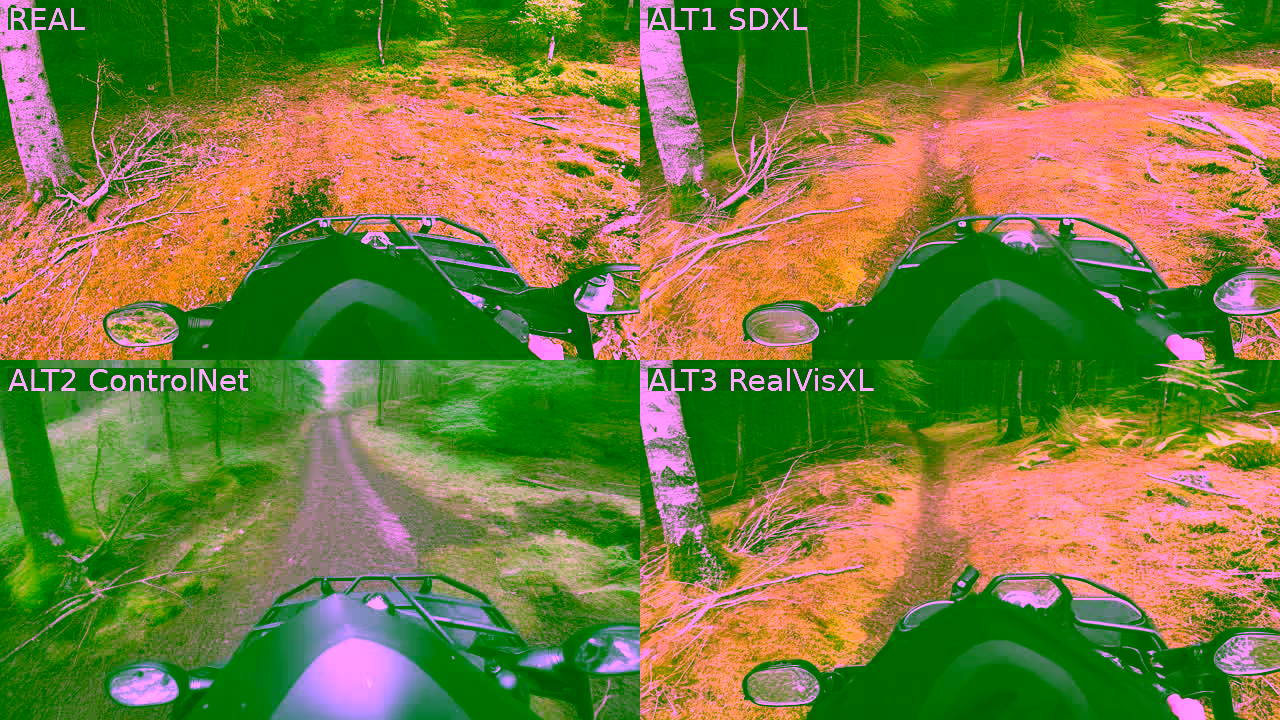
- SDXL-base, low strength (0.30), 30 steps — faithful, no melt, but a touch soft.
- ControlNet-Canny + SDXL — locks the real edges so nothing warps, but recomposed the scene greener and more stylised than the source.
- RealVisXL (a photoreal SDXL fine-tune), img2img — the winner: sharp, photoreal, keeps the real POV and palette, no melt.
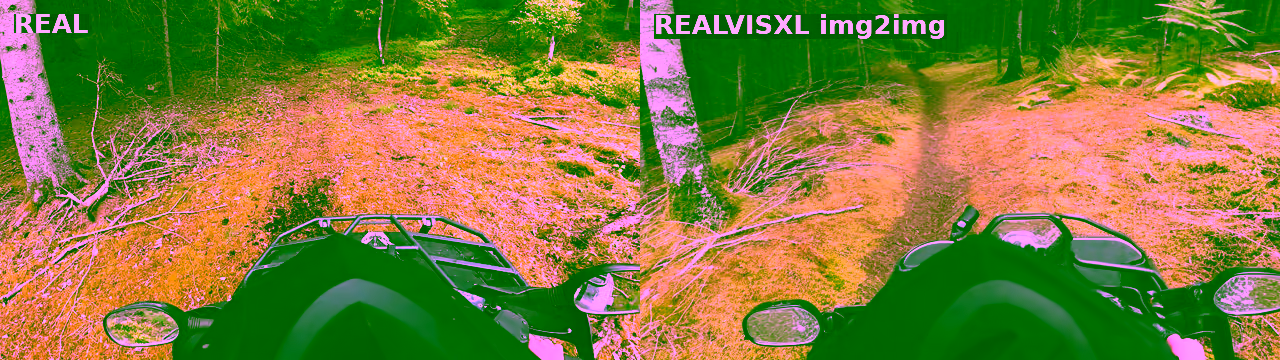
The lesson: for footage-matching, the base model and denoising strength matter far more than the prompt. A photoreal checkpoint at low strength beats a flashy distilled model every time.
3. AI Ken Burns — depth parallax
A still doesn’t have to stay still. Depth-Anything-V2 estimates a depth map for a frame in well under a second; with depth in hand you can render a 2.5D camera move where near pixels shift more than far ones, plus a gentle push toward the trail’s vanishing point. It reads like riding forward.
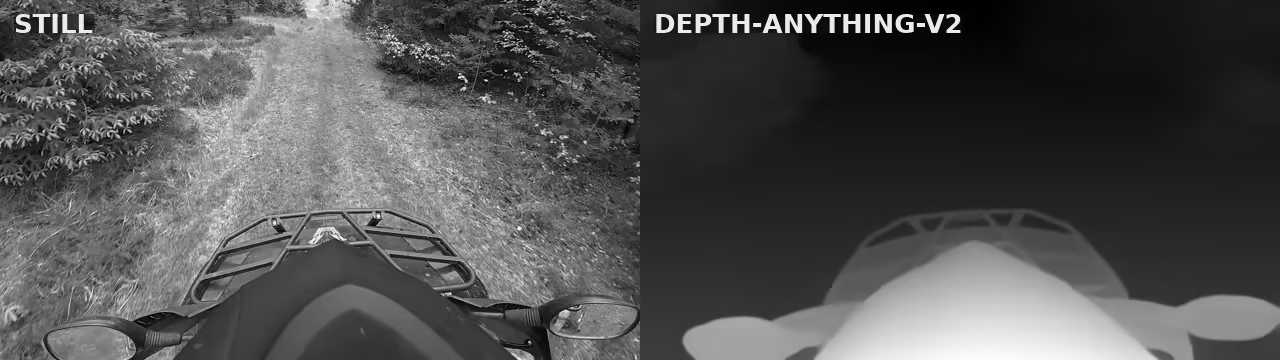
The whole render is a backward cv2.remap with depth-weighted displacement, so it’s hole-free and fast. One catch worth writing down: OpenCV’s remap wants float32 maps, and a stray Python scalar in the arithmetic silently upcasts them to float64, at which point remap asserts. Cast the maps back to float32 explicitly.
This is the best value-for-effort of the synthetic options: real content, real-looking motion, a tiny model. The only limit is that large pushes start to reveal warping at depth discontinuities — keep the move subtle.
4. Generative video — Stable Video Diffusion
If you want motion a static frame genuinely cannot fake, Stable Video Diffusion (image-to-video) animates a still into real movement — the camera drifts and pushes through the scene, parallax and all, invented by the model rather than warped geometrically.
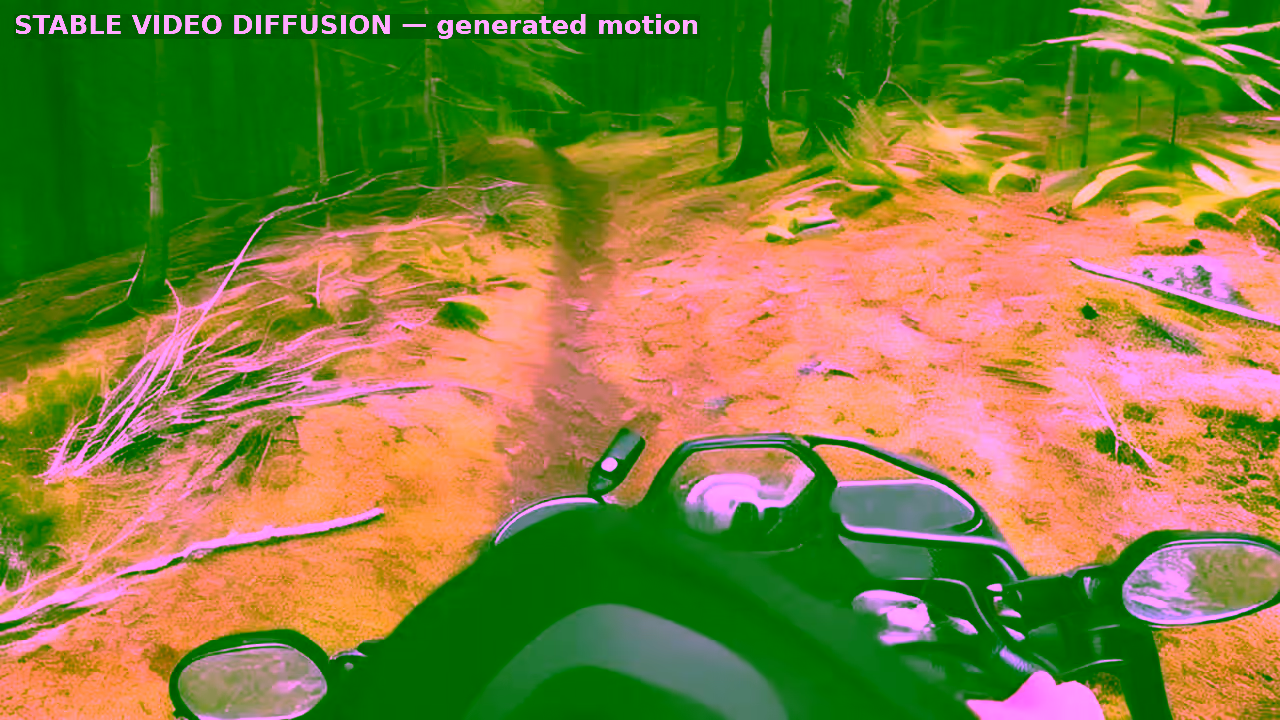
Seeding SVD from the RealVisXL stills gives generated motion that still looks like the ride. The honest caveats: clips are short (~2–3 seconds at 25 frames), the motion is only loosely controllable (you nudge it with a “motion bucket”, not a path), and there’s mild edge warping. It’s also the heaviest thing here — the model is ~9 GB and, on a 12 GB card, only fits with CPU-offload, UNet forward-chunking and a small VAE decode chunk:
pipe.enable_model_cpu_offload()
pipe.unet.enable_forward_chunking()
frames = pipe(image, num_frames=25, decode_chunk_size=2,
              motion_bucket_id=110, noise_aug_strength=0.04).frames[0]
5. Cinematic slow-motion — real footage, no AI
The fifth option uses no generative model at all. Take the auto-mined moments, slow them to 50% with motion-compensated optical-flow interpolation (so the slow-mo is smooth, not stuttery duplicated frames), stabilise lightly, and apply a filmic grade. ffmpeg does it in one filter chain:
minterpolate=mi_mode=mci:mc_mode=aobmc:me_mode=bidir:vsbmc=1:fps=60,setpts=2.0*PTS
It’s 100% real, looks premium, and is the most “broadcast” of the lot. Interpolation can smear very fast edges, but on scenic cutaways it’s clean.
Which one wins?
None — they’re complementary, and a real edit blends several:
| Method | Authenticity | Control | Cost | Best for |
|---|---|---|---|---|
| 1 · Auto-mine (CV) | Real | Limited to what you shot | Instant | Authentic cutaways, free |
| 2 · Generative stills (RealVisXL) | Synthetic | High (any scene) | Medium (GPU) | Shots you never filmed |
| 3 · Depth parallax | Real + fake motion | Motion only | Cheap | Bringing a great frame alive |
| 4 · SVD video | Synthetic | Loose motion | Heaviest (~9 GB) | Living motion with no footage |
| 5 · Slow-mo (real) | 100% real | Speed/grade | Medium | A premium cut of real moments |
If I had to ship one b-roll bed for this kind of footage, it’d be slow-mo (5) for the authentic premium feel, with depth parallax (3) to add motion to standout frames, and RealVisXL stills (2) only where I need an establishing shot that was never possible to film.
Stack
- GPU: one RTX 4070 Ti, 12 GB. Everything below fits.
- Diffusion:
diffusers0.38 — SDXL-base, RealVisXL V4.0, ControlNet-Canny-SDXL, Stable Video Diffusion XT. - Depth:
transformers+ Depth-Anything-V2-Small. - CV / assembly: OpenCV, NumPy, and ffmpeg (
minterpolate,deshake, AV1 NVENC, AVIF stills). - A couple of traps worth keeping: a distro Python marked PEP 668 externally-managed will silently refuse
pip install— use a real virtualenv. Andpgrep -f build.shhappily matches the watcher command that contains that string, so don’t trust it to tell you a render finished; check for a liveffmpeginstead.
Why it exists
This started as “the onboard clips need cutaways and I have one camera.” The honest answer turned out to be that you don’t need a second camera — you need to find the b-roll you already shot (1, 5) and fabricate the rest with the smallest model that does the job (3 before 2 before 4). The flashiest option (generative video) is the one I’d reach for last. The least flashy (scoring frames with a Laplacian) is the one I’d reach for first.
All local, all on a card that costs less than a weekend of cloud GPU. Not interesting until you need it — and then it’s exactly what you need.