Stitching drone panoramas: OpenCV vs Hugin, benchmarked
63 DJI Phantom 4 Pro frames over Randers, two stitching pipelines. OpenCV's Stitcher is fast and hands-off but leaves a wavy horizon and ragged edges; Hugin + enblend is slower but gives a dead-straight horizon, seamless blend, and a clean rectangle. Hugin wins.
TL;DR — I had a folder of 63 DJI Phantom 4 Pro frames shot over Randers and wanted panoramas out of them. I stitched the same sweeps two ways: OpenCV’s Stitcher (fully automatic, spherical) and the Hugin command-line pipeline (cpfind → autooptimiser → nona → enblend). OpenCV is fast (a few seconds) and keeps the widest field of view, but the horizon comes out wavy, the borders are ragged, and exposure seams are visible. Hugin takes ~30 s per panorama but gives a straight horizon, seamless multi-band blend, and a clean rectangular crop. For anything you’d print or publish, Hugin wins. Full commands and a benchmark table below.
The starting point
A folder, 63 files, DJI_0029.jpeg through DJI_0091.jpeg, ~15 MB each, 5464 × 3070 px. No flight log, no project file, and — as I’d find out — most of the useful metadata stripped. Just JPEGs and a stray result.jpg from someone’s earlier attempt.
First job: figure out what these photos actually are before deciding how to stitch them. Are they a nadir mapping grid? A single rotational panorama? Several separate sweeps? You stitch each of those differently.
Reverse-engineering the capture from metadata
No exiftool on the box, so:
sudo apt-get install -y libimage-exiftool-perl imagemagick
DJI normally writes gimbal yaw/pitch/roll into an XMP namespace, which would tell me exactly how the camera was pointing for each frame. Here it had been stripped — the files had clearly been re-exported at some point (which also explains that root-owned result.jpg). What survived was GPS and timestamps:
exiftool -n -T -FileName -GPSLatitude -GPSLongitude -GPSAltitude \
  -SubSecDateTimeOriginal DJI_*.jpeg
Two things fell out immediately.
There were two sessions, 90 minutes apart:
0029–0054, shot 09:01–09:150055–0091, shot 10:31–10:36
The second session was a stack of horizontal sweeps at rising altitude. The GPS position barely moved while the altitude climbed in clear bands — 169 m, then 221 m, then 240 m, then 269 m. That’s the signature of a drone hovering on the spot and panning the camera across the horizon at each height. Each altitude band is one panorama.
A quick contact sheet confirmed it:
ls DJI_*.jpeg | sed 's/.jpeg//' | xargs -P4 -I{} \
  convert {}.jpeg -resize 260x -gravity South -background black \
  -splice 0x16 -pointsize 13 -fill yellow -annotate +0+1 '{}' /tmp/thumbs/{}.png
montage /tmp/thumbs/DJI_00{55..91}.png -tile 6x -geometry +3+3 /tmp/sheet.png
Session one turned out to be mixed — top-down shots of a single property at varying heights (a vertical zoom sequence, not a panorama) plus some oblique neighbourhood passes. So I focused the panoramas on session two’s sweeps, which is what the drone was clearly there to capture.
The groups I settled on:
| Group | Frames | Altitude | Content |
|---|---|---|---|
| A | 0055–0065 | ~169 m | Residential, low pan |
| B | 0066–0076 | ~221 m | Town |
| C+D | 0077–0091 | 240–269 m | High skyline |
Technique 1 — OpenCV Stitcher
The path of least resistance. OpenCV ships a high-level Stitcher that does feature detection, matching, bundle adjustment, warping, and blending in one call.
pip install opencv-contrib-python numpy
import cv2, glob

imgs = [cv2.imread(f) for f in sorted(glob.glob("group_A/*.jpg"))]
stitcher = cv2.Stitcher_create(cv2.Stitcher_PANORAMA)   # spherical model
status, pano = stitcher.stitch(imgs)
if status == cv2.Stitcher_OK:
    cv2.imwrite("A_opencv.jpg", pano)
Two modes matter:
PANORAMAassumes the camera rotated about its optical centre (spherical warp). Correct for these hover-and-pan sweeps.SCANSassumes an affine/translational model (flatbed scans, nadir mapping). I tried it for completeness; it’s the wrong model here and collapsed most sweeps down to two or three frames. Don’t use it for rotational aerials.
I ran everything on a 2400 px working set first — full-res stitching is slow to iterate on, and you want to see whether a group connects before you commit minutes to it.
Verdict on OpenCV: it just works, with zero parameters, in seconds. Group A — eleven frames — stitched into a 10433 × 1595 panorama in about 5 seconds. The catch is the output: a wavy horizon, ragged torn edges you have to crop by hand, and faint exposure seams where frames meet. Fine for a quick look; not something you’d print.
Technique 2 — the Hugin pipeline
Hugin is the open-source panorama tool, and crucially its whole engine is scriptable from the command line — no GUI needed.
sudo apt-get install -y hugin-tools enblend enfuse
The pipeline, stage by stage:
pto_gen      -o p.pto  DJI_0055.jpeg ... DJI_0065.jpeg   # 1. project from EXIF
cpfind --multirow -o p.pto p.pto                          # 2. find control points
cpclean      -o p.pto p.pto                               # 3. drop bad matches
autooptimiser -a -m -l -s -o p.pto p.pto                  # 4. optimise + level horizon
pano_modify --canvas=AUTO --crop=AUTO --projection=2 \
             -o p.pto p.pto                               # 5. cylindrical + auto-crop
nona  -m TIFF_m -z LZW -o remap p.pto                     # 6. remap each frame
enblend -o pano.tif remap*.tif                            # 7. multi-band blend
What each stage buys you over the OpenCV one-liner:
cpfind --multirowfinds proper control points across the whole set — it reported 250, 302, and 718 points for groups A, B and C+D respectively.autooptimiser -l -slevels the horizon and straightens the panorama. This is the single biggest visible win: the wave disappears.--projection=2is cylindrical, which keeps the horizon a straight horizontal line — exactly what you want for a wide aerial sweep.--crop=AUTOtrims to the largest clean rectangle, so no manual cropping.enblenddoes multi-band (Burt–Adelson) blending, which hides the exposure differences between frames that OpenCV left visible.
Same group, two pipelines, stacked — OpenCV on top, Hugin below:
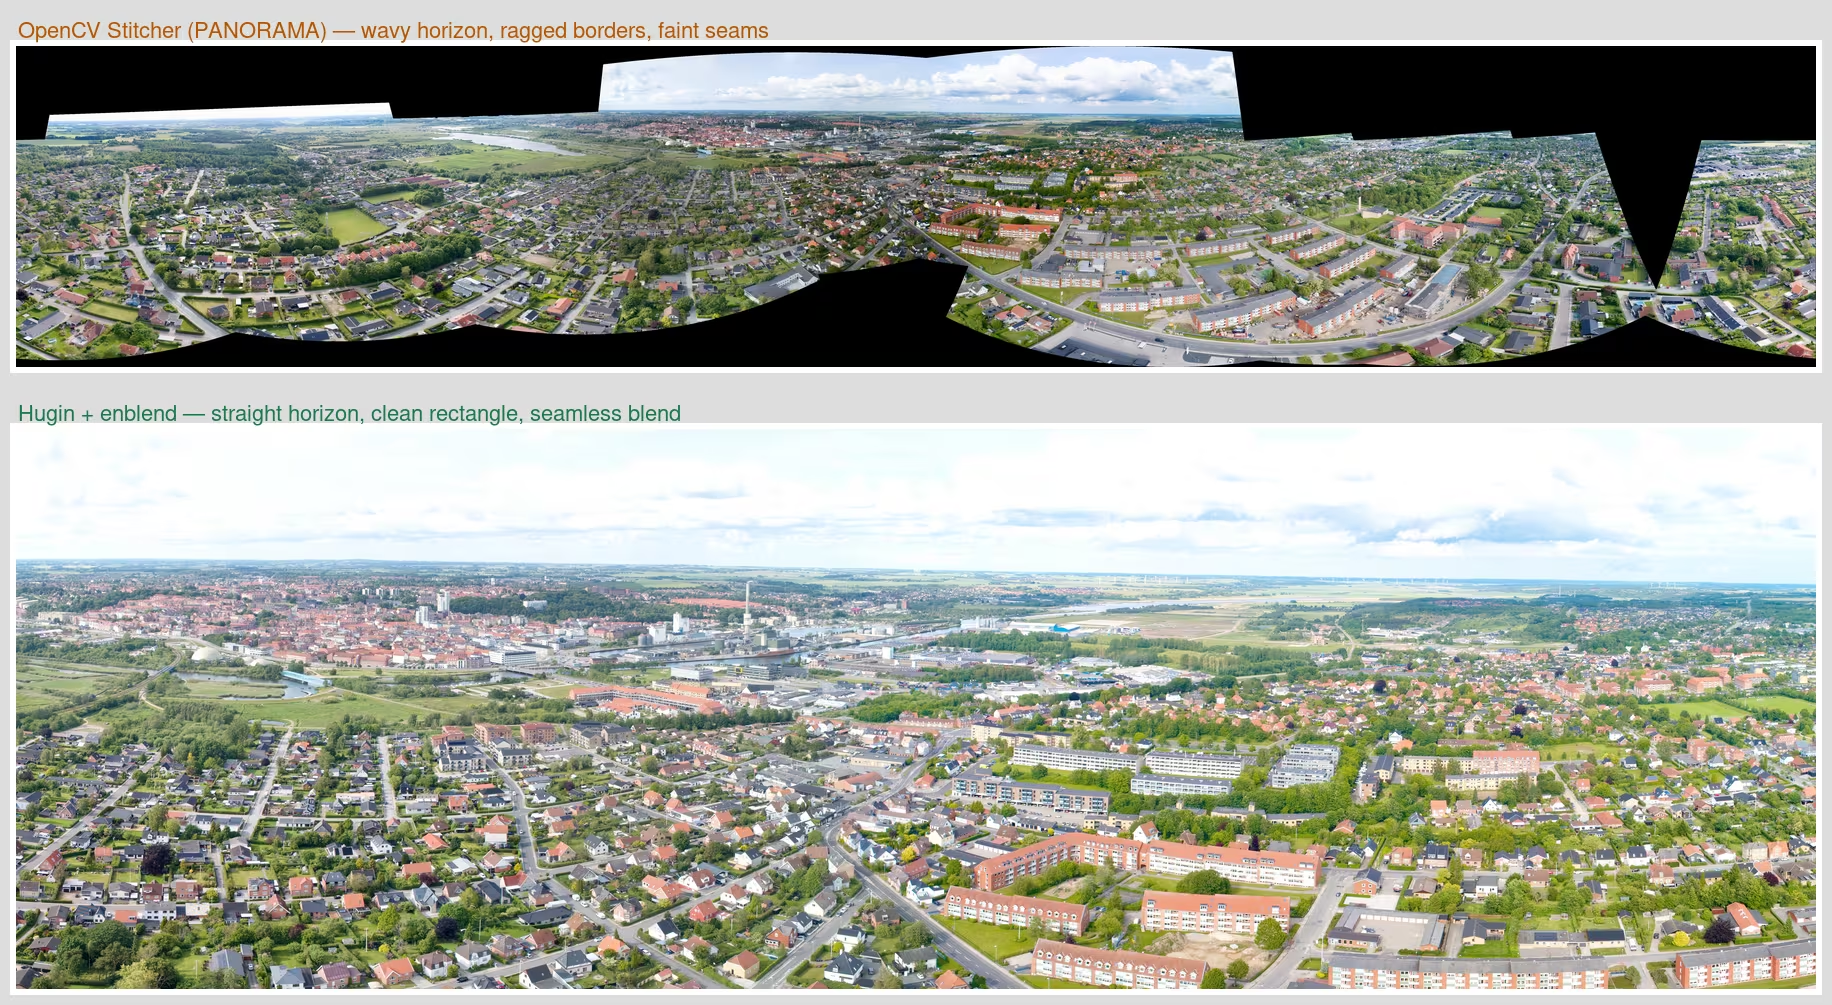
The difference isn’t subtle.
The benchmark
Same input groups, both pipelines. OpenCV numbers are the 2400 px working set; Hugin numbers are the final full-resolution 5464 px runs.
| Group | Imgs | Tool | Result | Time | Horizon | Blend | Crop |
|---|---|---|---|---|---|---|---|
| A · residential | 11 | OpenCV PANORAMA | 10433 × 1595 | 5 s | wavy | seams | ragged |
| A · residential | 11 | Hugin + enblend | 11581 × 1827 | 31 s | straight | seamless | clean |
| B · town | 11 | OpenCV PANORAMA | 10295 × 1838 | 11 s | wavy | seams | ragged |
| B · town | 11 | Hugin + enblend | 8190 × 2547 | 30 s | straight | seamless | clean |
| C+D · skyline | 15 | OpenCV PANORAMA | 8660 × 1975 | 2 s | wavy | seams | ragged |
| C+D · skyline | 15 | Hugin + enblend | 22469 × 2391 | 60 s | straight | seamless | clean |
OpenCV is 3–10× faster and tends to keep a wider field of view (it warps and keeps the torn edges rather than cropping them). Hugin is slower but wins on every quality axis that matters for a finished image.
Going full resolution
Once Hugin was the clear winner I re-ran it on the original 5464 px frames. The pipeline is identical — just point pto_gen at the original JPEGs instead of the downscaled set. cpfind and enblend are the slow stages at full res, but it still came in around 30 s per panorama, a minute for the 15-frame skyline.
The finished panoramas:
The high skyline — fifteen frames, 22469 × 2391, a near-180° sweep across the whole town:

The residential sweep at 169 m:

The town at 221 m:
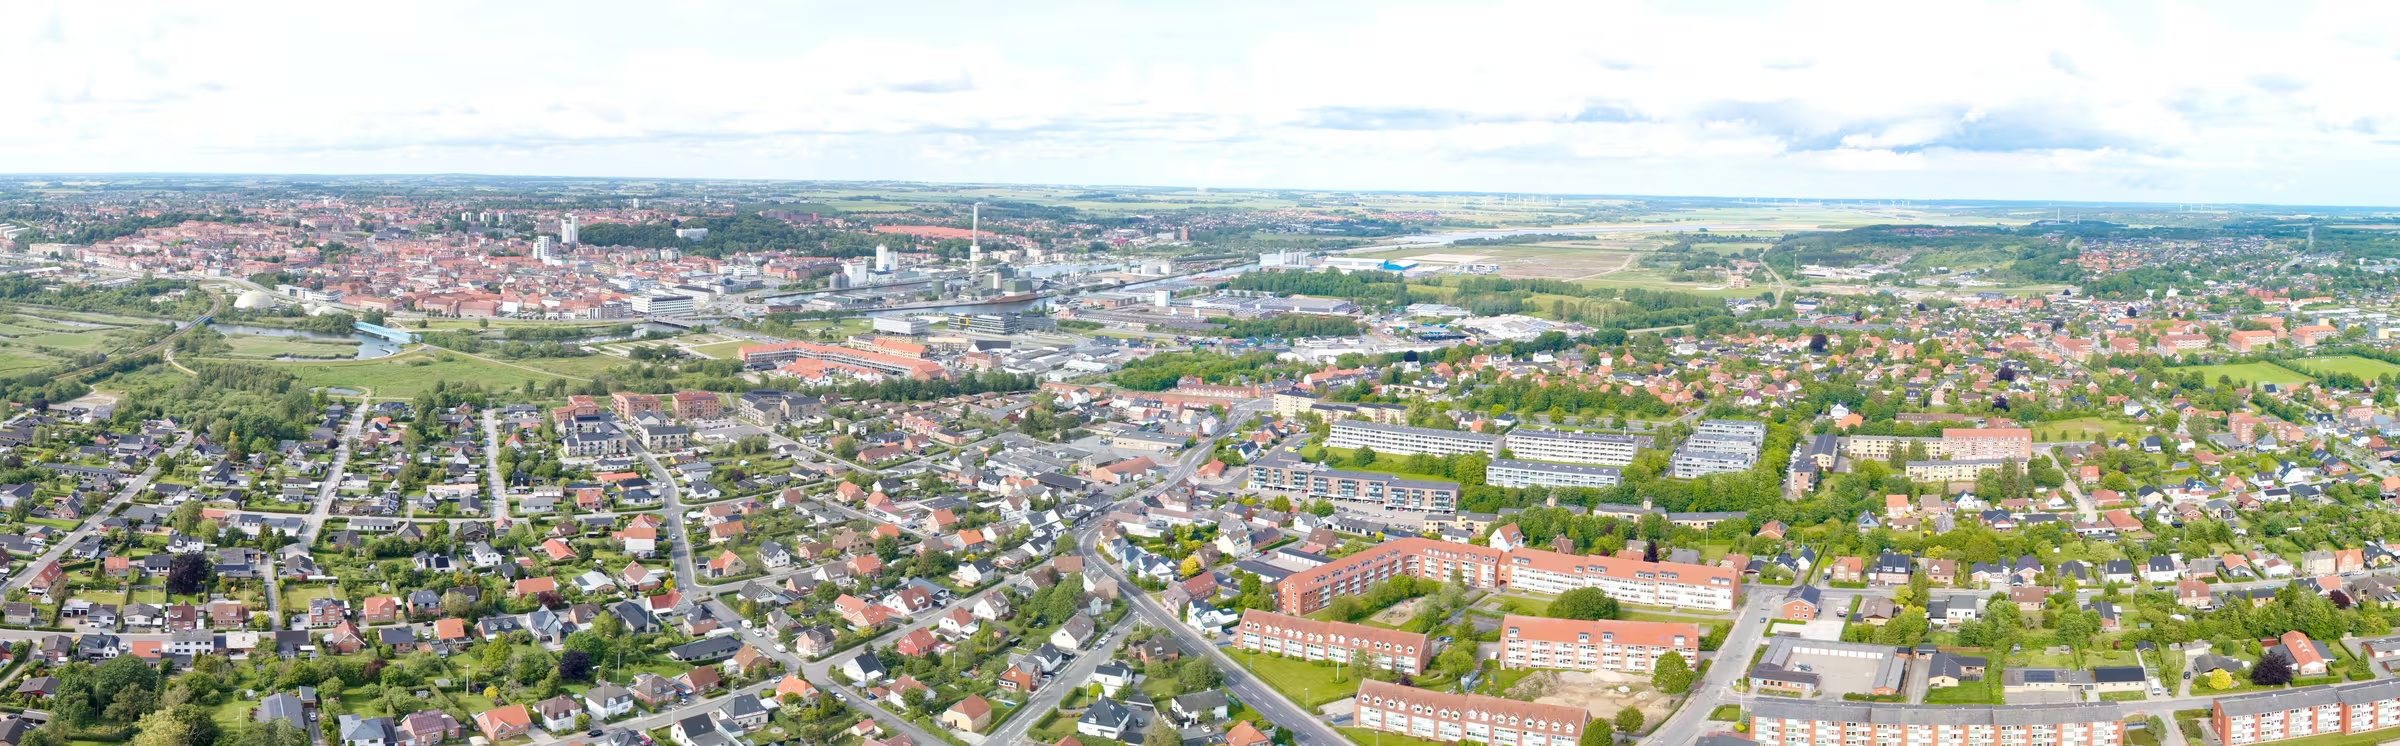
At 22469 px wide the skyline is comfortably large-format printable.
FAQ
Why did the metadata matter so much — why not just throw all 63 into the stitcher?
You can, and OpenCV will try to find connected components. But the files were two unrelated sessions plus a mix of nadir and oblique frames. Feeding the lot in risks the optimiser bridging frames that shouldn’t connect, or wasting minutes failing to. Five minutes with exiftool to group the frames first saved a lot of guessing — and told me which groups were even panoramas.
Why not just use the drone’s built-in panorama mode?
These weren’t shot as in-camera panoramas — they’re individual frames from manual sweeps, and the on-board stitch (if it ran at all) is the low-res result.jpg I found in the folder. Stitching from the original full-res frames yields far more detail than the in-camera JPEG.
What about PTGui / Lightroom / Microsoft ICE?
All capable. PTGui is essentially commercial Hugin and excellent. Lightroom’s Photo Merge is convenient if you’re already in it. Microsoft ICE was great but is discontinued. I wanted a scriptable, free, Linux-native pipeline I could run headless over a folder — that’s Hugin.
Cylindrical, spherical, or rectilinear?
For a wide horizontal sweep, cylindrical (--projection=2) keeps the horizon straight and handles >120° without the extreme stretching rectilinear gives at the edges. Spherical (what OpenCV’s PANORAMA uses) is fine too but tends to bow the horizon unless the pitch is well estimated — which is harder here because the gimbal angles were stripped.
Can this run unattended over a whole folder?
Yes — the entire Hugin path is CLI, so it drops straight into a shell script or a Makefile. Group the frames (by timestamp/altitude, or just let cpfind find connected components), then loop the seven commands per group. That’s the real argument for Hugin over a GUI tool here.
Verdict
If you want a panorama now and don’t care about a wavy horizon or trimming edges yourself, OpenCV’s Stitcher is a five-second one-liner and genuinely impressive for the effort.
For anything you’ll keep — print, publish, hang on a wall — the Hugin command-line pipeline is worth the extra half-minute. A straight horizon, a seamless blend, and an automatic clean crop are exactly the things that separate a snapshot from a finished panorama, and Hugin gets all three for free. It’s now my default for stitching anything off the drone.
The whole thing — install to finished full-res panoramas — was about an hour, most of it spent understanding the photos rather than stitching them. Which is usually how these go.